Dynamics AX Retail Installation Guide – Part 1

I will try to post here a step by step guide to install Dynamics AX R3 Retail. I will split this tutorial in 2 parts

Part 1 : Headquarters Installation
Part 2 : Store Installation

In TechNet you will find an architecture guide that I recommend to take a look before following this tutorial https://technet.microsoft.com/EN-US/library/jj991928.aspx

1.Install Retail Headquarter

You must install this component where AOS Server installed, it is mandatory.

Start Microsoft Dynamics AX Setup
Select “Retail headquarters” option, and then click Next.

Picture1

In Dynamics AX Client Open, Retail > Setup > Parameters > Retail parameters.
Click Initialize

Picture2

Restart Microsoft Dynamics AX AOS Service.

In Dynamics AX Client Open Retail > Common > Retail channels > Retail stores
Select the store you want to publish and then click “Publish”.

Picture3

Click “Workers” in select Store to Setup Workers

workers

Open Worker, click in the left side Retail and then “POS permissions”

POSPermissions

Apply the proper POS Permissions in Worker

2.Install Async Server

Start Microsoft Dynamics AX Setup
Select “Async Server” option, and then click Next


async1


Fill the Website settings that async server will be hosted. Than into consideration that a valid SSL certificate must be installed on IIS

async2

Async Server requires a SQL Server and database to store messages.

async4

Open AX Client in Setup > Retail scheduler > Channel integration

And create a Async Server Profile

async5

Define the Staging Area between Dynamics AOS and Async Server

Open Retail > Setup > Retail scheduler > Channel integration > Working Folders and configure folders

async6

Create a “Channel Data Group”

Open Setup > Retail scheduler > Channel integration > Channel Channel datagroup


datagrp2

Open Retail >Periodic >Data Distribution >Distribution Schedule

For each job define the data group

ds


Open Retail > Setup > Retail scheduler > Channel integration > Channel database

Define the channel settings to be used in async client

async8


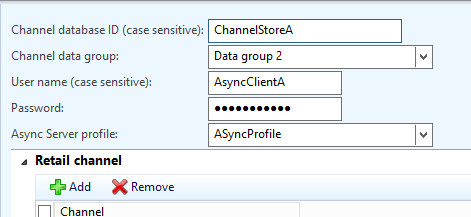
Configure the location of AsyncServer database

async9V2

3. Install Sync Server

Start Microsoft Dynamics AX Setup
Choose “Real Time Service” and choose next

sync1


Configure Settings of the Sync service


sync2
Open Retail > Setup> Retail scheduler > Channel integration > Real-time Service profiles

Configure Sync service location

sync4

Implementing Master Data Management (MDM) between Dynamics AX 2012 R3 and Dynamics NAV 2013

Microsoft Dynamics R3 ships with Master Data Management (MDM), a feature to synchronize master data between AX instances and other applications. MDM module handles most business requirements concerning master data: publishing, filtering, conflict management, etc.

MDM is built on top of Microsoft SQL Server Master Data Services (SQL MDS), requiring a SQL Server Enterprise Edition to work properly. Very little effort is required to publish master data records between AX instances with MDM enabled.

The goal of this post is demonstrate an approach of managing customer information centrally in AX and publishing it to other applications, in this particularly case Dynamics NAV, since many customers have various ERP’s in their environment.

A single-master configuration has implemented, only the AX 2012 instance can write to MDS, Dynamics NAV will be a read-only subscriber. This decision will eliminate the biggest issue in MDM, the conflict management.


Drawing1


Set up SQL MDS

Open SQL Server Open Master Data Services Configuration Manager

Select “Create database” and fill the database name, in this case, I have choosen MDM.

Capture2

Select “Web Configuration” and fill Website Name and then click “Create Application”. Associate database MDM with the created web application.


Capture3_1

Open “Microsoft Dynamics AX Management Shell” At the Windows PowerShell command prompt, execute the  command.  “Set-AXMasterDataManagementMDSSetup –MDSServerName localhost MDSDatabase MDM”

Replace server and database parameters with your values

Capture1

Set up Dynamics AX


Open “Data import export framework” -> Master data management -> Configure SQL Server Master Data Services connection.


Fill SQL Server where MDM is installed ,set database name to “MDM. In the MDS service endpoint field, enter the URL for the MDS web application, followed by /service/service.svc.

Capture4_1


Click “Test Configuration”.If everything is correctly configured, a success message should is displayed.

Capture5


Open Data import export framework -> Master data management -> Publish entities to SQL Master Data Service

Select Customer Entity and click Create schema. After the schema have been created, the checkbox  in the “In MDS” column will be checked.

Capture6


Open Data import export framework -> Master data management -> Manage Synchronization

Create a new sync group. Enter name and choose the proper company.

Capture7

Click Entities and then fill “customer” value in the Entity field

Capture8

Select customer entity and click Settings, take note of Subscription view because will need it later. Ajust

Capture9

Open Data import export framework -> Master data management -> Manage Synchronization

Click New schedule and define the recurrence according to your requirements.

Capture10


Open Data import export framework -> Master data management -> Manage Synchronization

Click Synchronization History to check if the job is running properly.

Capture11


Set up Dynamics NAV

Open SQL Server Enterprise Manager.
Query the SQL View DMFCustomerEntity_View in MDM database, and it should display all the customer records exported from Dynamics AX.


Capture12

Create a view in NAV database with the required fields from the view DMFCustomerEntity_View

Capture13

In the Dynamics NAV, create a new table with the exact same name and fields of the view DMFCustomerEntity_View. Before saving the object, select the LinkObject property to true.

CaptureNAV1

Run the table object to see all the data records. Implement a custom object to import data from this virtual table to customer table of Dynamics NAV.

CaptureNAV2


Dynamics AX DB Entity Relationship Diagrams

Microsoft released a pack of Dynamics AX entity relationship diagrams. This pack covers most core tables of the product. For example an ERD of Customer table

These diagrams are available in http://www.microsoft.com/dynamics/ax/erd/ax2012r2/Default.htm

To help you find the correct information you also have an Alphabetical list of tables.

Erd-One-AcctRecv-M1-CustTable-vsd


You can also build by yourself these diagrams using the built in Reverse engineering tool, please check  http://msdn.microsoft.com/en-us/library/aa499193.aspx